Welcome to Residential Architecture 101: Shower Design – a new post in a long-dormant series that I am already regretting putting together. While I think a post like this will ultimately be extremely helpful to some people, I know that even more people will undoubtedly hammer on me for not doing something a particular way. (I’m already starting off cranky, aren’t I?). Let’s just get this bit out of the way:
- This is not intended to be the end-all/be-all with regards to how showers can be designed. This is really a post that is focusing on some questions that you should consider as you work your way through your own possibilities.
- If I say something is a certain dimension, it is not an absolute – I am stating my preference. We all can admit that there are options.
- I am not talking about Master Bathroom showers – those have many more considerations to them than just the items discussed here.
- Things change when budgets get bigger
- Things change when rooms get bigger
The intent of this post is to simply point out the things that might be worth thinking about since showers, while not incredibly complicated, have a lot of moving parts and tend to be items that all “regular-sized” bathrooms revolve around. Finally, I decided to start with showers because I prepared some of these sketches as I was working with co-workers on some of the new residential projects in the office and I need to bring more designers up to speed and I have a tendency to avoid answering questions choosing to explain the thought-process so they will be forever equipped to solve these sorts of problems for themselves moving forward.
So, now that I’ve tried to insulate myself and knowing that people are still going to come after me in the comments, let’s get this shower-party started.
Residential Architecture 101: Shower Design – Begin at the Beginning

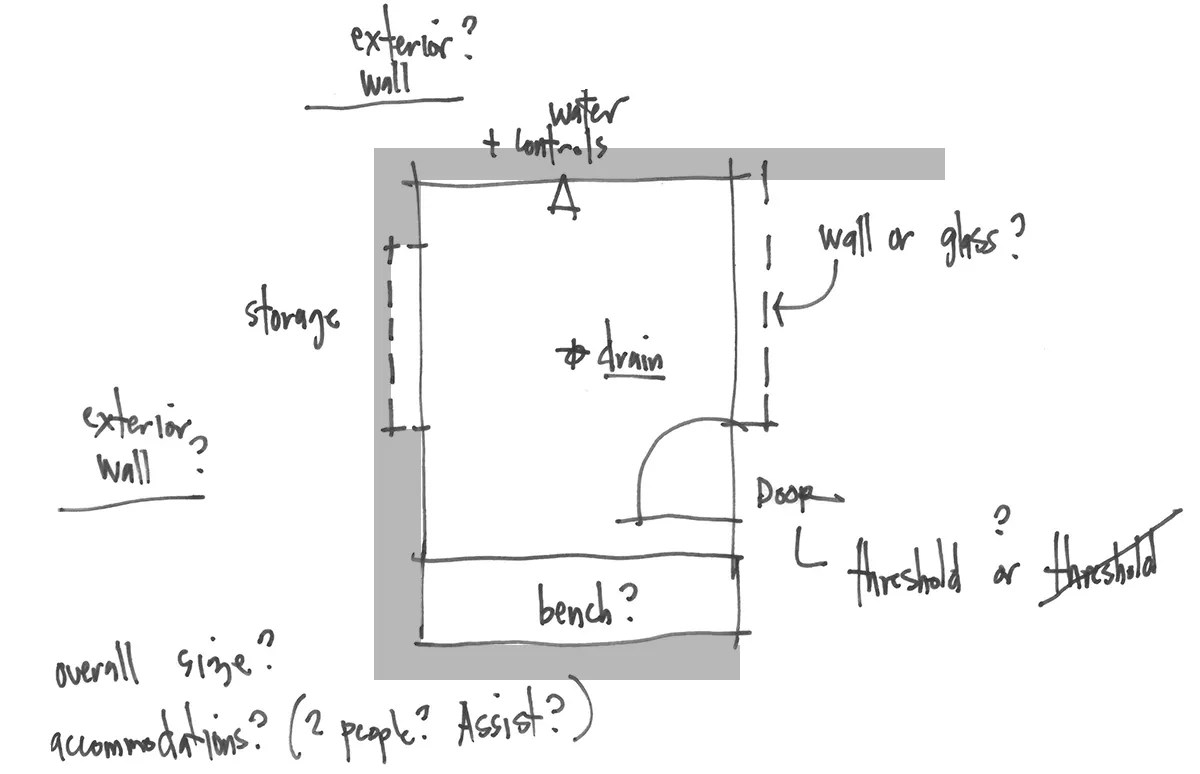
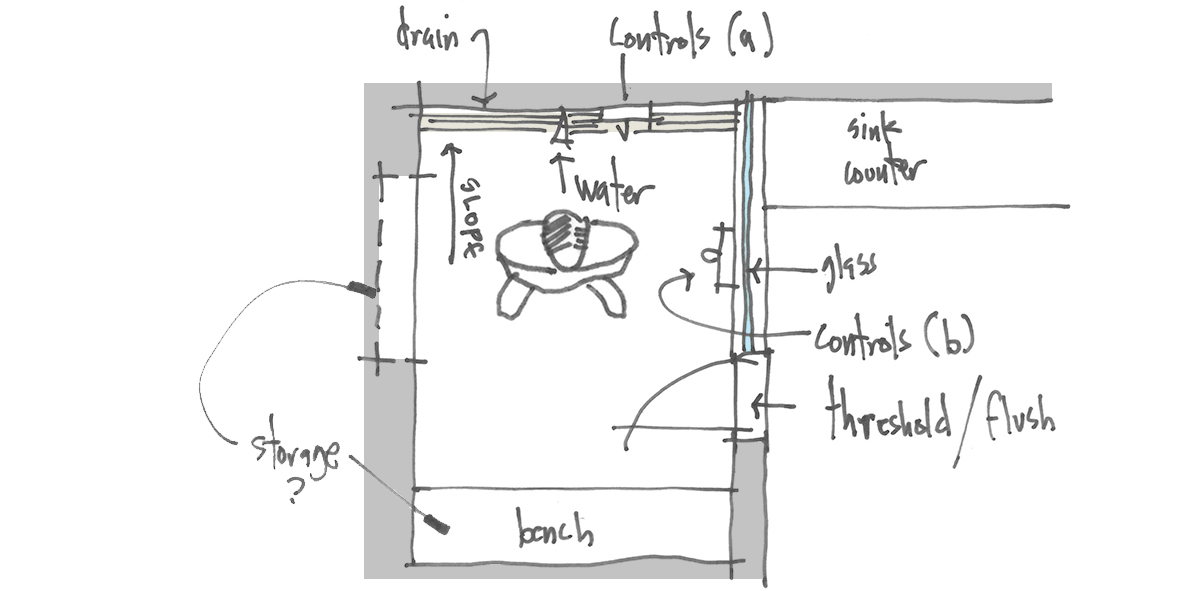
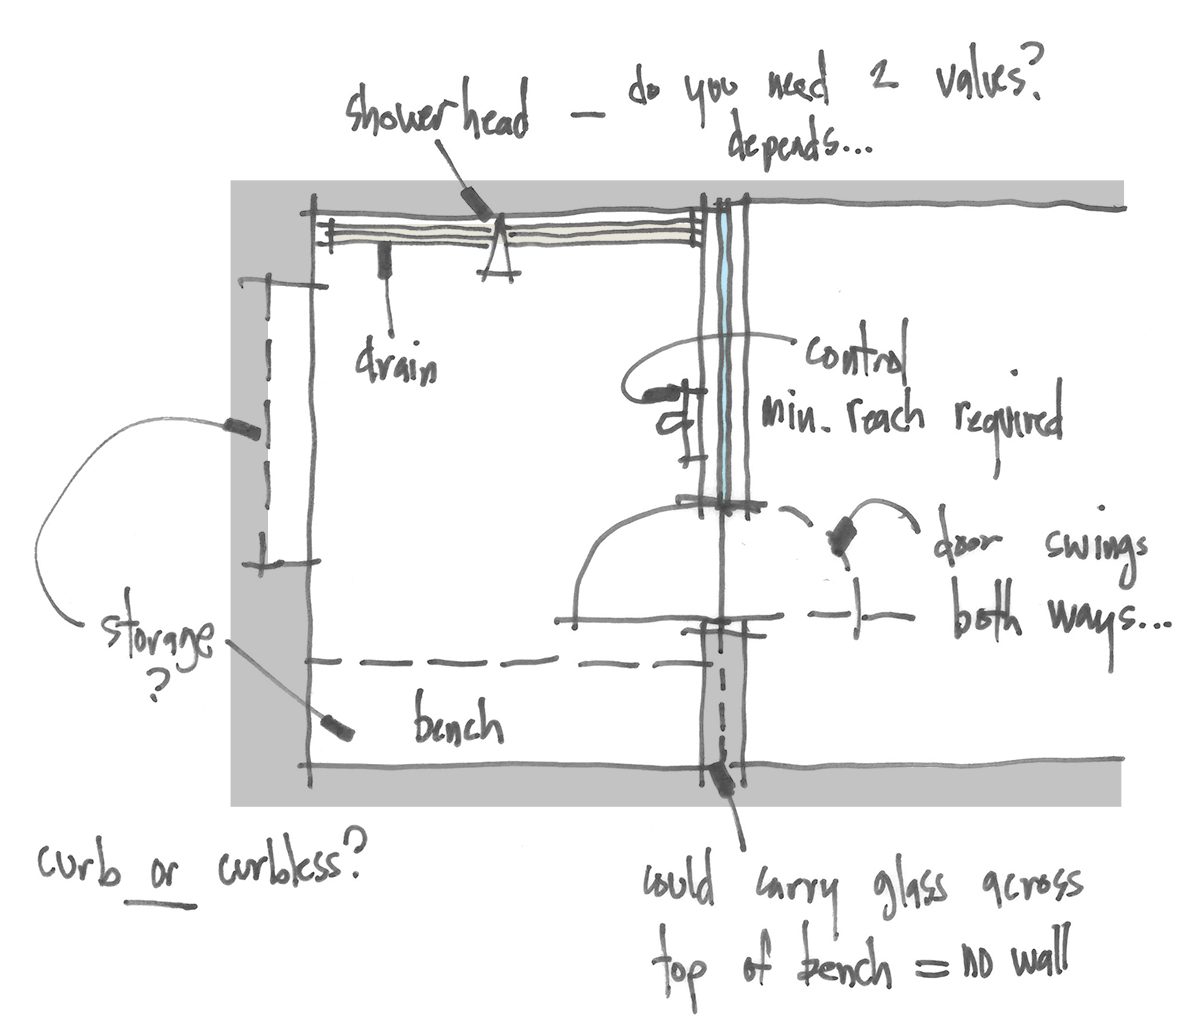
The first sketch I put together was to simply introduce the basics – things like:
- showerhead
- controls
- drain location
- storage
- door location
- how “visible” is the shower going to be?
- bench or no bench?
If I take each one of those bullet points from above, there are some decisions to be made, and while I agree that they aren’t particularly difficult, they do have an impact on the final product. I could make each one of these topics a stand-alone conversation but I’m not going to do that to you.
Showerheads – Things like type, locations, height above the floor, fixed or adjustable, is there multiple heads, is there a rain showerhead … it goes on for a while.
Controls – where are they located? Can you reach them without having to walk into the shower? are there more than one? Did you know that you might have one to control temperature, and then another to control where the water comes out, possibly more than one if you want the water to come out of more than one source at the same time??
Drain location – there really isn’t a ton to talk about here other than I don’t like standing on top of shower drains and they are almost always generically placed right where people want to stand. There are options and things you can do to make this situation better, but you have to actually think about it ahead of time.
Storage – most of the time these are simply called niches but I flip-flop between the two names. How many of them are there? Where on the wall are they located? Are they exposed to direct water-spray?
Door Location – In most “regular-sized” bathroom rooms this issue takes care of itself. Door size is another matter (22″ is the smallest and 36″ is generally the largest – but if you need wheelchair access, you might consider removing the door altogether. And then there is the matter of curb versus curbless … )
Bench or no Bench? – this is also a simple matter but the consideration centers almost exclusively around providing a place for people to elevate and place their foot when shaving their legs. It could be a niche instead of a bench but you still want to protect the leg from the direction of the water.
Size Considerations
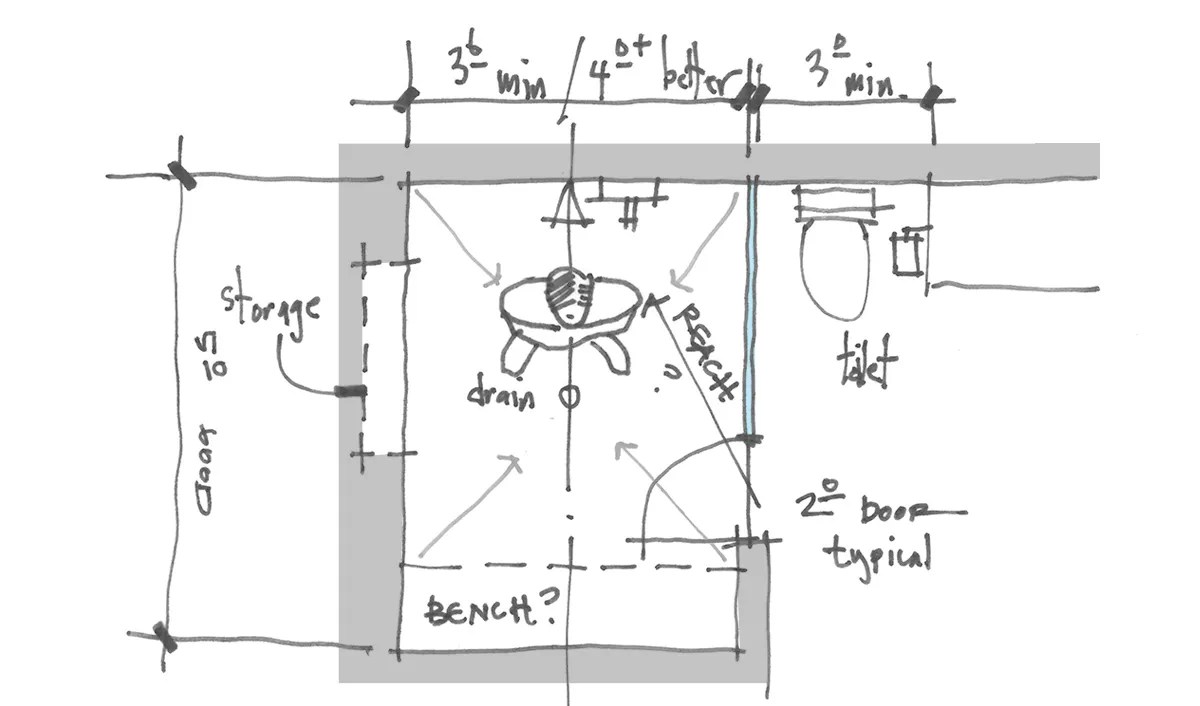
Are there typical sizes for showers? Sure – but most people who lay them out have some slight tweaks they like to consider. For example, I like my “small” bathrooms to be no narrower than 5′-4″ wide … and I chose this dimension so that I can use a standard 60″ tub and still have 2″ on either side so that I can create an “inside corner” to transition my tile rather than using a metal edge trim piece (which I generally do not care for).
You also have to consider if your toilet is next to your shower or if you are going to have your sink countertop run up and against the shower (I am referring to the classic shower/toilet/sink arrangement that are all on a single wet wall (wet wall just means that’s where all the plumbing is located – could be a small cost consideration).
Can you have a shower that is too big? Of course, you can – I see it all the time. I wrote a post a long time ago titled “I’d like a McShower please … and supersize it!!” and it addressed the pitfalls of designing a huge shower from a performance standpoint (the large shower indicated is actually quite lovely and skillfully designed). Generally, I am not talking about the showers that are found in Master Baths – those are frequently considered under unique conditions. The more practical aspects of what I am focusing on today have to do with 2nd and 3rd bathrooms.
I like to have a shower wide enough that you can towel off while remaining in the shower. I am 6′-1″ but have a 6′-8″ arm span and if I can towel off in a 4′-0″ wide shower, so can you. If you have a requirement to spin around like Julie Andrews in the Sound of Music, that will definitely require more space.
*this is a shower design post so please don’t come at me letting me know that there should be a bathtub in the house for the following reasons blah, blah, blah. I know that there should be at least one bathtub in the house but that is not my focus today.
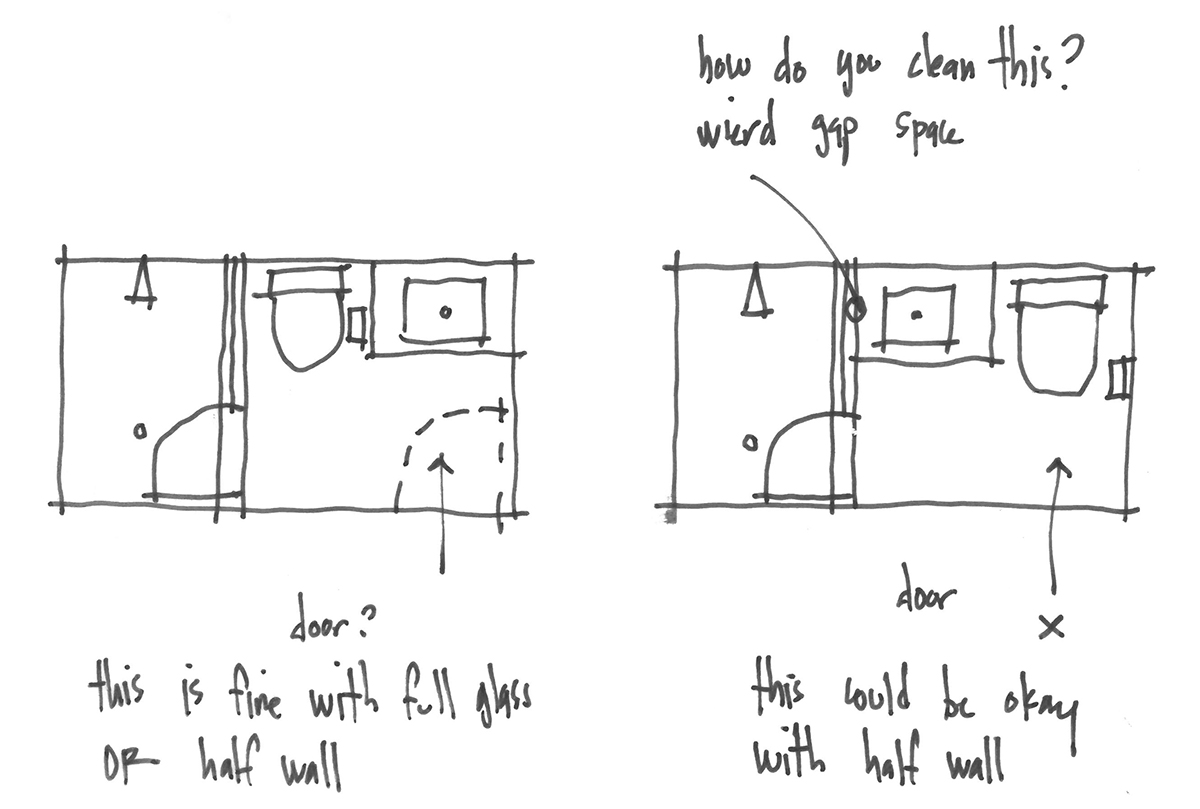
Let’s talk about why you would, or would not, typically have a toilet next to the shower. Personally, when you have the bathroom trinity (shower/toilet/sink) all on the same wall, you would want to have the toilet next to the shower wall. It might help you decide whether or not you will have a full glass wall or a half-height partition separating the toilet from the shower but you would definitely NOT have a full-height glass wall next to the cabinet that contains the sink. Maybe it’s easier to look at a typical arrangement?
The layout on the left is my go-to because I like that I have options on whether or not a use a half wall or a full-height glass wall (mostly referring to possible storage and valve locations but we’ll get to that in a moment). I also like that the obvious door placement into the bathroom has your view from the adjacent space looking at the sink, not to mention that the door in the open position can lay against the wall without any possible conflicts.
okay? Back to the space between the shower and the toilet or cabinet …
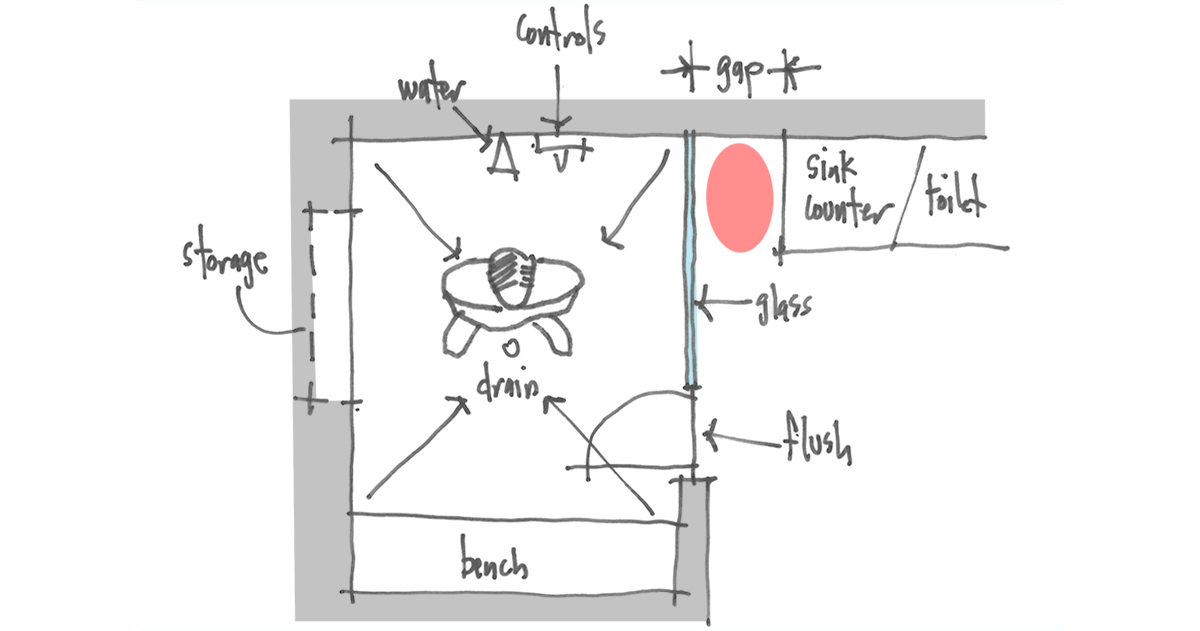
You can’t do full height because you would essentially be trapping something between the end of the cabinet and the face of the glass.
Gross.
If you pull the cabinet off the glass, just a little though, not enough to put the toilet there, you might have solved the entombed grossness issues but now you have created a space dedicated to the placement of a small plastic waste bin that will ultimately but full of the sorts of things nobody really ever wants to see.
Also gross, but slightly less.
Might as well put a toilet there and have that gap serve a proper purpose.
Let’s move on and talk about that wall that could either be full height glass or half-height … why would you do that? Possibly so your cabinet could die into the shower but most of the time it is to accommodate the location of a shower valve.
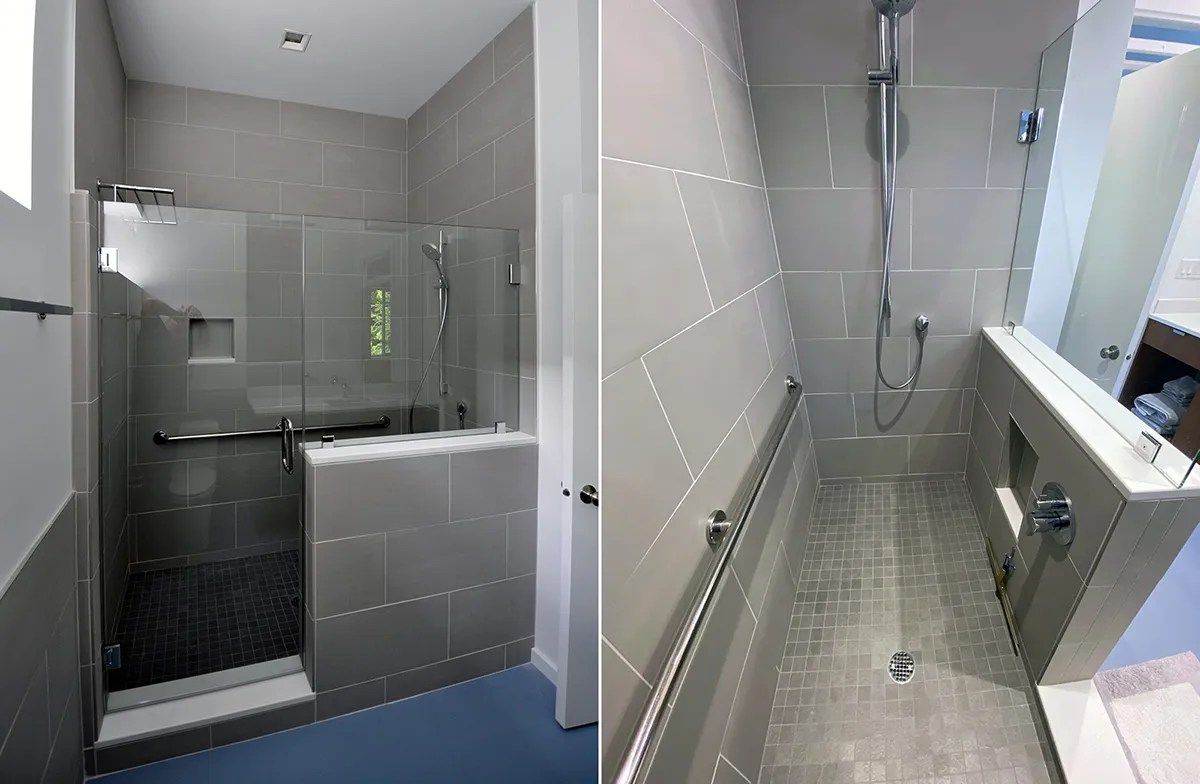
Let’s take a look at this shower – while it isn’t configured exactly as shown in my sketch, it is close enough for the purpose of our conversation.
On the left-hand side of the image above, you can see what I mean when I say a half-height wall. You can see the door and then the wall immediately to the side. You should also note that there is a slight bit of wall extending out on the hinge side of the shower door – that’s so the shower door hardware doesn’t hit the wall when the door is opened to 90 degrees.
On the image to the right, you can now see that the control valve for the shower is located just inside the door. This will allow you to turn the water on without having to enter the shower. We also have a niche in this half-height wall for the storage of soaps and shampoos that is out of sight from the rest of the bathroom. For you eagle-eyes, the niche you see on the long side wall on the left is for your coffee mug – a special request from this client.
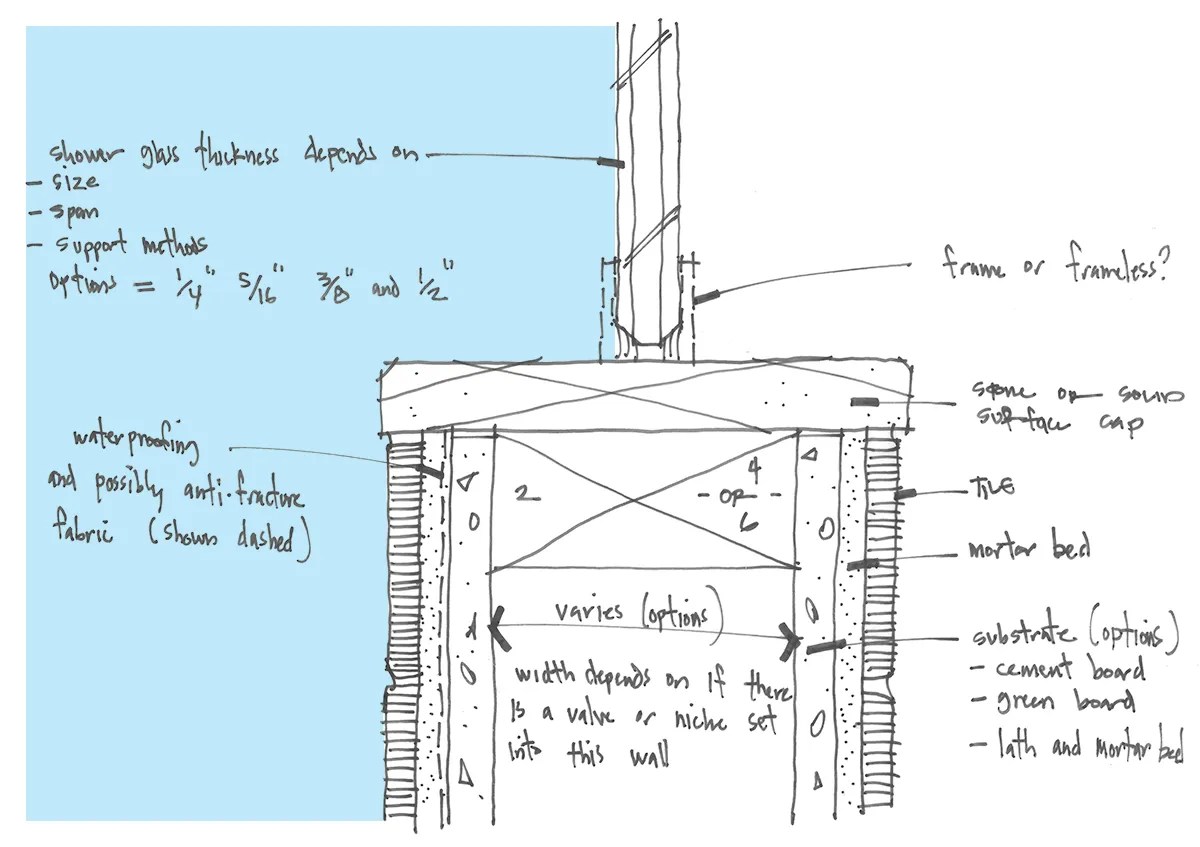
This was a quick sketch to walk through how a shower wall might be constructed – and I am aware of some of the more technical items I did not acknowledge (so don’t bring them up – adding silicon to my shower glass or not showing a setting block for the glass if it were in a frame, etc. … ). The point of this sketch was to talk about how to finish off the top of a half-height wall, the introduction of a framed or frameless shower, and that you could make this wall as thick as you needed to accommodate a shower valve or a recessed niche for storage.
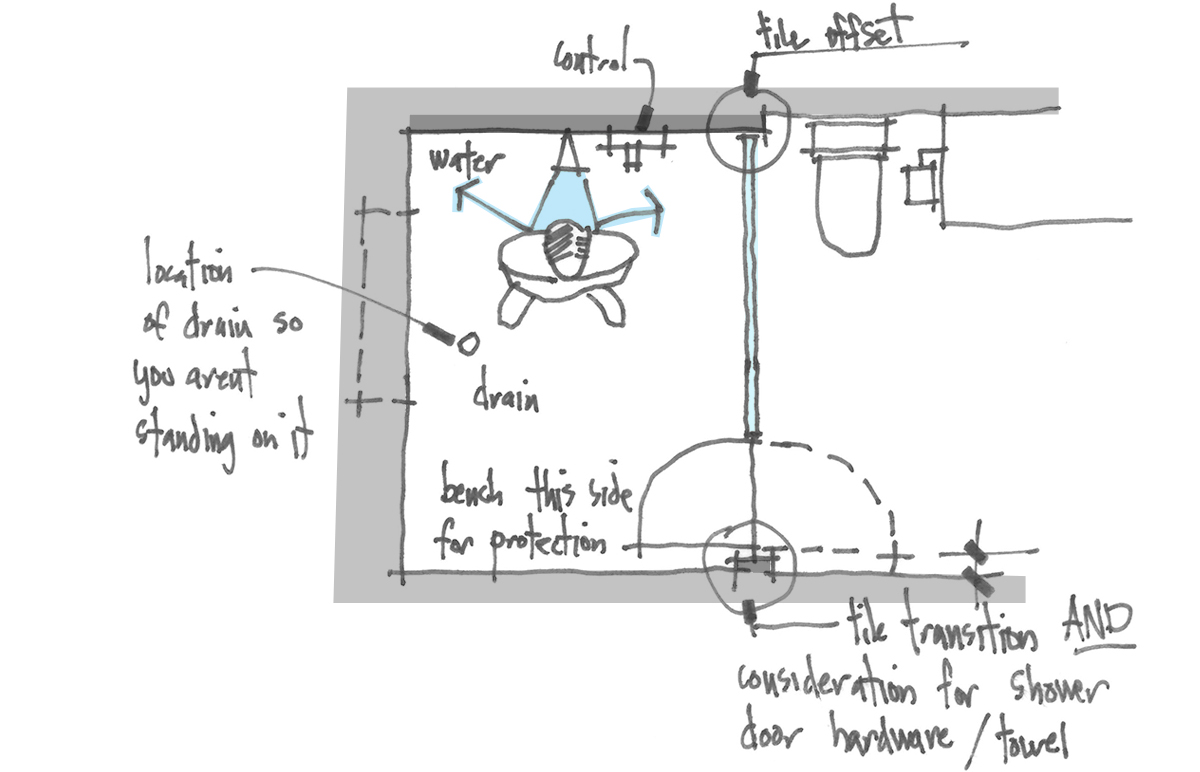
So in this particular sketch, I was talking about the location of the shower drain … Why does it ALWAYS have to be in the middle of the shower, seemingly in the place where I most want to stand. I find this incredibly frustrating since this is such an easy thing to avoid.
Also in this sketch, you can see in a slightly darker shade of grey the 2″ offsets at both ends of the glass shower wall. By adding these slight offsets, I have now created an inside corner for myself and I can resolve my tile at a corner rather than having to look at the end of it without providing such an offset. Again – this is an easy thing to accomplish
I put a note on this sketch about bench consideration – most people want them, but more for having a place to elevate and rest your leg for shaving than looking for a place to rest during your presumably intense and exhausting shower regimen. You don’t have to put a bench in for this reason … a well-placed niche could accomplish the same objective. The only real consideration is that you want to be able to use your back to prevent water from spraying onto your lathered-up areas. I would also recommend this foothold to take place around 18″ above the ground – any lower is awkward, and any higher is really awkward.
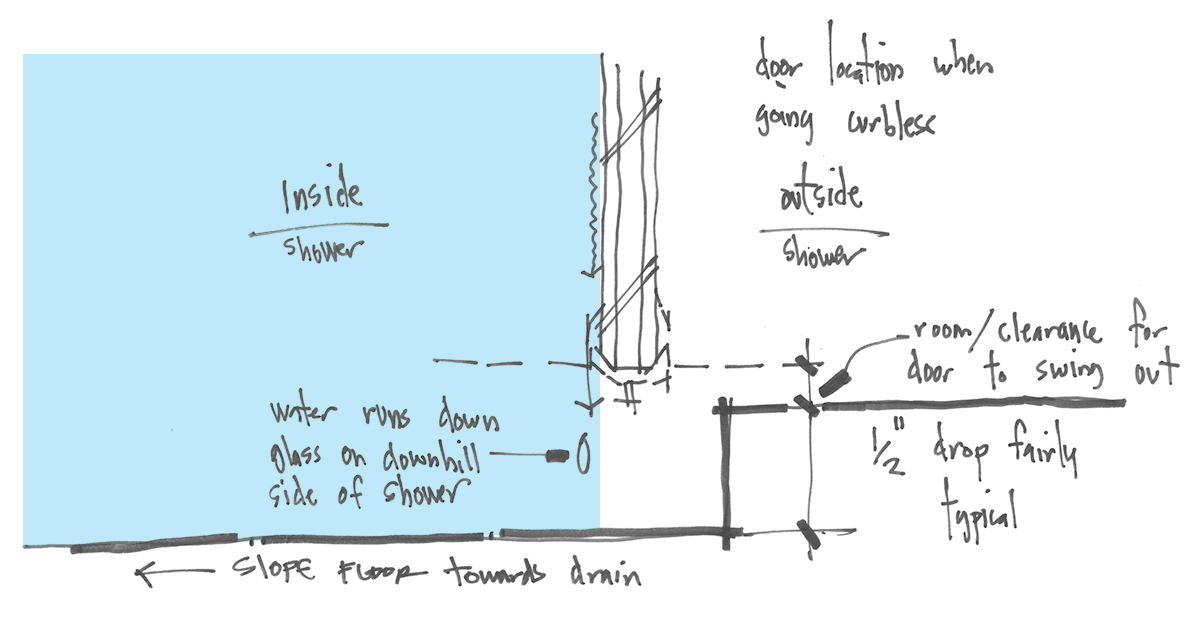
You would think this detail I sketched above – it’s more of a graphic note than a detail – would be pretty obvious but I just wanted to make sure. If you have a curb-less shower, you want to make sure that the inside face of your shower door, when in the closed position, hovers above the lower part of your threshold. This is how you keep water from running out of your shower and into the bathroom.
If you have a curb, just be sure to note that there would be a slight pitch (slope) back towards the inside of the shower.
To be brutally honest, there isn’t really any new information in this sketch but since I have it, I’m going to show it here. I will say that I drew in a linear slot drain towards the showerhead side of the shower. It’s pretty rare that I ever use a linear drain outside of the Master Shower but I suppose it is a possibility. The only complaint I’ve ever really heard from using a slot drain is that if the occupant has long hair and tends to shed a lot, clogs are a bigger pain to clean up. I also showed a wall at both ends of the shower bench because a) nobody wants to see 27 bottles of shampoo and body scrub, and b)it makes for a clean tile transition, and lastly c) gives a rock-solid spot for me to attach a glass shower door.
There are definitely a few things that will help you consider how you might lay out your own shower, but if nothing else, you can see that there are more moving parts to a shower than meet the eye at first pass. There are another dozen or two things that I could go into (towel placement?!?) but this post is already over 2,000 words long and I’m honestly tired of talking about showers.
While this post was intended to be the first in a series of “101” sort of posts, I’ve actually already covered a few items years ago in a series I titled “Residential Architecture 101”. I didn’t make it very far having written only three posts:
- Residential Architecture 101 – Materials
- Toilets by the Front Door
- Residential Architecture 101 – Shutters
- Residential Architecture 101 – Wood Veneer
- Kitchen Pantry Design 101
and while you might not think these are the most interesting of topics, you would be incorrect. I can promise you that this content is devastatingly sexy AND educational – a combination that most architectural blogs could only dream of achieving.
I don’t have an editorial calendar on the topics I choose to discuss, I just take the topics that I am currently working on with the staff in my office and take that content to turn into one of these blog posts. This means that I am open to suggestions on possible topics you would like to explore. I will confess that these sorts of posts require considerable effort and time to assemble and therefore I don’t put them together very often. When discussing topics like Shower Design with junior designers in my office, there is a back-and-forth conversation that takes place, and the sketches that I create as a result of that conversation don’t make sense since they are iterative in their nature.

PS – for more entries in the Residential Architecture 101 series, click here

